A picture can save you from a haircut you never intended to get.
You may walk into a barbershop knowing exactly how you want to look, but explaining that vision with words alone isn’t always easy. Terms like “low fade,” “textured top,” “short back and sides,” or “clean taper” can mean slightly different things to different people.
That’s why reference photos are one of the most useful tools you can bring to a barber.
But here’s the catch: not every haircut photo is equally useful.
Showing one random front-facing selfie may not give your barber enough information to understand the shape, fade, length, and finish you’re after.
A smart collection of reference photos can give your barber a much clearer blueprint.
Whether you’re searching for a Barber Near Me, considering a barber Oak Park, or looking for a Barbershop in Oakville, here are the five essential types of photos worth showing before the clippers start.
5 — The Front View: Show the Overall Shape
The first photo should show the haircut from the front.
This is your “big picture” reference.
Your barber can use it to understand:
- Overall hairstyle
- Fringe or front length
- Hairline appearance
- Amount of volume
- Texture
- Styling direction
- General silhouette
For example, if you want a textured crop, the front view can show whether the fringe sits straight across, slightly forward, or naturally separated.
If you’re after a longer swept-back style, it can demonstrate how much visual height and movement you want.
Choose a useful front photo
Try to find a picture where the hair is clearly visible.
Avoid photos with:
- Heavy filters
- Hats
- Extreme shadows
- Sunglasses covering the face
- Excessive hair products
- Dramatic camera angles
The clearer the reference, the easier it is for your barber to interpret.
One important reminder
Don’t expect an exact copy.
Your hair may be thicker, thinner, curlier, straighter, or differently shaped than the model’s hair.
The photo is a direction, not a guarantee.
4 — The Side Profile: The Photo Your Barber Really Needs
If you could only bring two photos, the front and side views would be excellent choices.
The side profile reveals details that are almost impossible to understand from a front-facing picture.
It shows:
Fade height + temple shape + sideburn + top length + overall profile
This is particularly important when requesting a fade.
A photo may look like a “low fade” from the front, but the side view can reveal exactly where the fade begins and how high it travels.
What your barber can learn from a side photo
A side reference can show whether you want:
- A low fade
- Mid fade
- High fade
- Taper
- Drop fade
- Longer side length
- Shorter sideburn
- Strong temple definition
It also helps communicate how the top should connect to the sides.
If you’re visiting a barber Oak Park, don’t be afraid to show the side profile and say:
“This is the part of the haircut I really like.”
That tells your barber where your priorities are.
3 — The Back View: Don’t Forget What You Can’t See
Most clients focus on the front.
Some remember the side.
Very few think about the back.
But your barber has to create the haircut from every angle.
A back-view reference can help communicate:
- Neckline shape
- Fade progression
- Hair length
- Weight distribution
- Taper around the neck
- How the haircut finishes at the nape
Why the neckline matters
A neckline can completely change the personality of a haircut.
A natural neckline can create a softer appearance.
A squared neckline can provide a more structured finish.
A tapered neckline can create a cleaner transition as the hair grows.
None of these is automatically better.
The important thing is choosing the finish that works with your haircut and natural growth pattern.
Your barber’s job is three-dimensional
Think about it this way:
You aren’t asking for a picture.
You’re asking for a three-dimensional shape.
The front, sides, and back are all pieces of that shape.
That’s why multiple reference angles are so powerful.
2 — A Photo of Your Own Hair From Before
This might be the most overlooked reference of all.
Instead of only showing your barber someone else’s haircut, show them your own previous haircut.
Why?
Because your barber can see what your hair actually does.
A previous photo may reveal:
- Your natural texture
- Your growth direction
- How your fringe falls
- Your natural volume
- Your hairline
- Your cowlicks
- How your fade grows out
If you loved your previous haircut, tell your barber why.
For example:
“I liked this length because it was easy to style.”
Or:
“I liked how the sides grew out, but I want the top slightly longer this time.”
That’s much more useful than simply saying:
“Do this again.”
Your barber now knows which parts to preserve and which parts to improve.
1 — The “After Styling” Photo: Show the Finish You Actually Want
The final and perhaps most important photo should show the hairstyle after it has been styled.
This is especially useful for longer, textured, curly, or swept hairstyles.
Why?
Because the haircut and the styling are two different things.
A photo might show:
- Matte texture
- High volume
- Slick-back finish
- Natural movement
- Side-part styling
- Messy texture
- Defined curls
Your barber needs to understand whether you’re attracted to the haircut itself or the way it has been styled.
Ask yourself:
Do I want the haircut—or the styling?
That’s an important distinction.
A haircut may provide the foundation, but achieving the exact appearance may require:
- Blow-drying
- Hair clay
- Pomade
- Sea salt spray
- Curl cream
- Styling powder
- A particular brushing technique
If you don’t want to spend 15 minutes styling your hair every morning, tell your barber.
They can adapt the haircut to your routine.
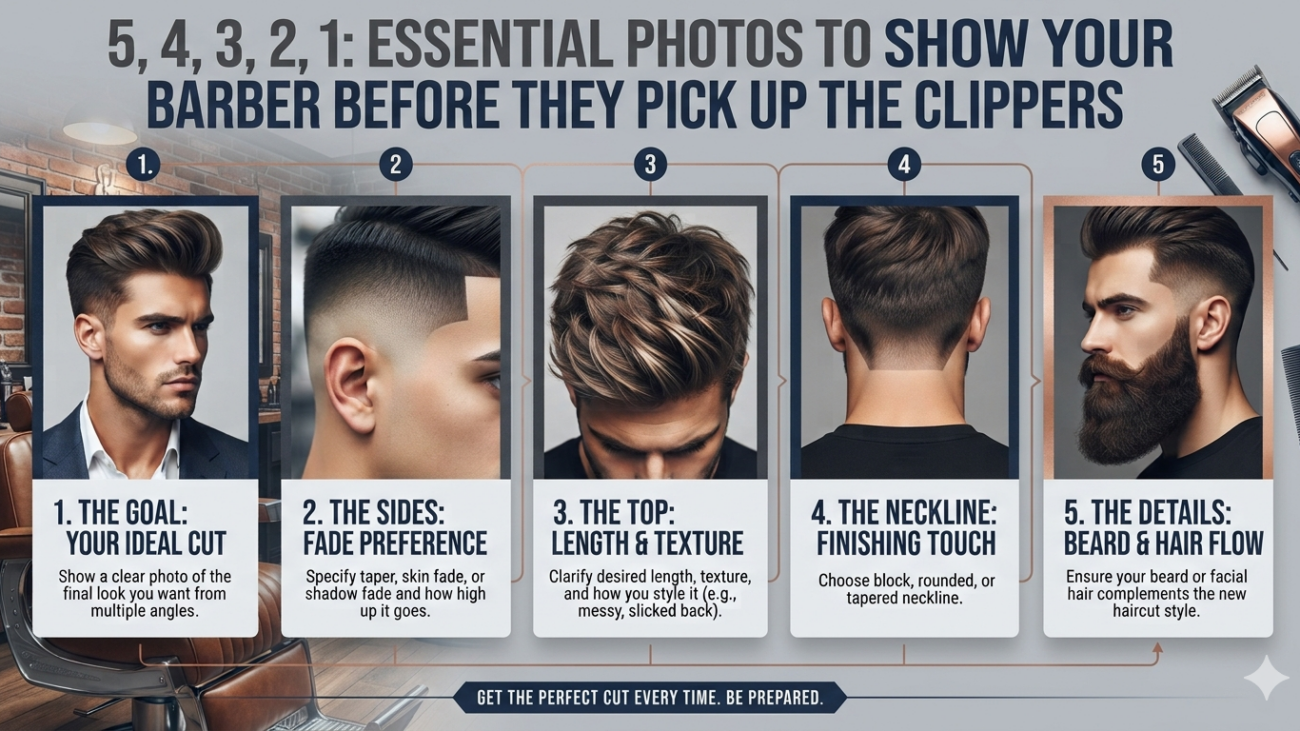
The Ultimate 5-Photo Haircut Reference Set
If you want to make your next barber consultation extremely simple, save these five images:
5. Front View
Shows the overall shape and front styling.
4. Side View
Shows fade height, side length, and profile.
3. Back View
Shows the neckline and rear fade.
2. Your Previous Haircut
Shows how your own hair behaves.
1. Finished Style
Shows the final texture and styling you want.
Together, these photos tell a much more complete story than one image ever could.
Don’t Just Show the Photos—Explain Them
Here’s where the real communication happens.
Don’t hand your barber five pictures and say:
“I want this.”
Instead, explain what you like in each one.
For example:
Photo 1: “I like the front shape.”
Photo 2: “I want this fade height.”
Photo 3: “I like this neckline.”
Photo 4: “This is how my hair looked when I liked the length.”
Photo 5: “I want this type of texture, but I don’t want to use much product.”
Now your barber has a complete set of instructions.
You aren’t asking them to copy five different hairstyles.
You’re giving them five pieces of information about one hairstyle.
Why One Photo Can Sometimes Be Misleading
Imagine you show your barber a photograph taken from the front.
The haircut looks fantastic.
But you can’t see:
- How high the fade goes
- Whether the sides are disconnected
- How the neckline is shaped
- How much length remains behind the ears
- How the haircut looks from the side
Your barber has to guess.
And guessing is where misunderstandings begin.
This doesn’t mean you need a professional photoshoot.
Even two or three clear reference angles can dramatically improve communication.
Avoid Photos With Heavy Filters
Social media has changed how haircut photographs look.
Many images now include:
- Skin smoothing
- Hair enhancement
- Artificial sharpening
- Lighting effects
- Face reshaping
- Colour grading
These can make a haircut appear very different from reality.
Look for clean, natural reference images whenever possible.
The goal isn’t to find the most attractive photograph.
It’s to find the most informative photograph.
Consider Your Hair Texture Before Choosing the Photo
A reference photo should be realistic for your hair.
Straight hair
Look for references with similar thickness and natural movement.
Wavy hair
Choose photos where the waves have a similar pattern.
Curly hair
Pay attention to curl density and shrinkage.
Fine hair
Look for styles that achieve volume through shape rather than relying entirely on extremely thick hair.
Thick hair
Find references that show how bulk is managed rather than simply removed.
At Men Zone, the best reference isn’t necessarily the trendiest image online. It’s the one that gives your barber enough information to adapt the look to your natural hair.
What If Your Barber Says the Photo Won’t Work?
Don’t take it personally.
A good barber may tell you that a particular style needs modification.
That could be because of:
- Hair density
- Hairline
- Cowlicks
- Face shape
- Hair texture
- Existing haircut
- Growth pattern
- Maintenance requirements
Instead of asking:
“Can you copy this exactly?”
Ask:
“What version of this would work best with my hair?”
That’s a much more productive question.
The goal isn’t to recreate another person’s head.
The goal is to take inspiration from the photo and create something that works specifically for you.
You might also like: Why Professional Haircuts Are Easier to Maintain at Home
How Many Photos Should You Bring?
You don’t need 25 pictures.
In fact, too many can make the consultation confusing.
A strong collection of 3–5 carefully chosen photos is usually much more useful.
Choose photos that answer different questions:
What should the front look like?
How high should the fade be?
How should the back finish?
How should my hair be styled?
What did my previous haircut look like?
That’s enough to create a clear visual reference.
Show Your Barber What You Don’t Want Too
This is a clever trick that can prevent misunderstandings.
If there’s a haircut you’ve had before that you hated, take a picture.
Then explain:
“I don’t want this much weight on the sides.”
Or:
“I don’t want the fade this high.”
Or:
“I don’t like this neckline.”
Sometimes showing what you dislike is easier than explaining what you want.
At Men Zone Barbershop, a clear consultation can help turn reference photos into a haircut that fits the client’s hair, face shape, and lifestyle instead of simply reproducing an image.
For clients looking for a local option, the location is:
209 Oak Park Blvd Unit 102, Oakville, ON L6H 0M2, Canada
Before the Clippers Start: Use the 30-Second Check
Before your barber begins, quickly confirm four things:
Fade:
“Are we keeping the fade low?”
Top:
“Are we keeping this much length?”
Back:
“I want the neckline natural.”
Beard:
“Please blend the sideburn into the beard.”
This takes less than a minute.
But it can eliminate a lot of confusion.
Final Thoughts
The right haircut reference isn’t necessarily the coolest picture on your phone.
It’s the picture that communicates the most useful information.
A front view shows the overall shape.
A side view explains the fade.
A back view reveals the neckline.
A photo of your previous haircut shows how your own hair behaves.
And a finished styling photo explains the final look you’re trying to achieve.
Put those five pieces together, and your barber has a much clearer blueprint before picking up the clippers.
So next time you’re searching for a Barber Near Me, considering a barber Oak Park, or choosing a Barbershop in Oakville, don’t just bring inspiration.
Bring information.
A few carefully selected photos and a short conversation can turn “I want something like this” into a haircut that’s much closer to what you actually imagined.
Frequently Asked Questions
1. How many photos should I show my barber?
Three to five clear photos are usually enough. Choose different angles or photos that communicate specific details rather than showing many nearly identical images.
2. Should I show front, side, and back photos?
Yes. Multiple angles help your barber understand the haircut as a complete shape rather than trying to guess what the unseen areas should look like.
3. Can I show my barber a celebrity haircut?
Yes. Celebrity or model photos can be useful references. However, your barber may need to adapt the style to your hair texture, density, face shape, and hairline.
4. Should I bring a photo of my previous haircut?
Definitely. If you liked a previous haircut, the photo can help your barber understand what worked well with your natural hair.
5. What if my hair doesn’t look like the photo?
That’s completely normal. Your barber can usually adapt the important elements of the reference to suit your own hair and facial features.
6. Should my reference photo show the hair styled?
Yes, especially if you’re requesting a textured, swept-back, curly, or voluminous style. A styled photo helps communicate the desired finished appearance.
7. Are filtered haircut photos good references?
Natural photos are generally better. Heavy filters, artificial lighting, and editing can make hair texture, density, and colour appear different from reality.
8. Can I show my barber a haircut I don’t want?
Yes. Showing an unwanted haircut can be surprisingly useful. Explain exactly what you dislike about it so your barber knows what to avoid.
9. Should I explain what I like about each photo?
Yes. This is one of the best ways to use reference images. Tell your barber whether you like the fade, top length, texture, neckline, or overall shape.
10. What is the most important photo to bring?
There isn’t one universal answer, but a clear side-profile photo is especially valuable for fade-based haircuts because it shows the fade height and relationship between the top and sides.
Add a Comment